![Wet Sanding with Orbital Sander: Complete Guide [Updated]](https://cdn.bestorbitalsander.com/cms/articles/88/348512d5b0ce-makita-wert-sanding.jpg)
Wet Sanding with an Orbital Sander: The Safe Protocol
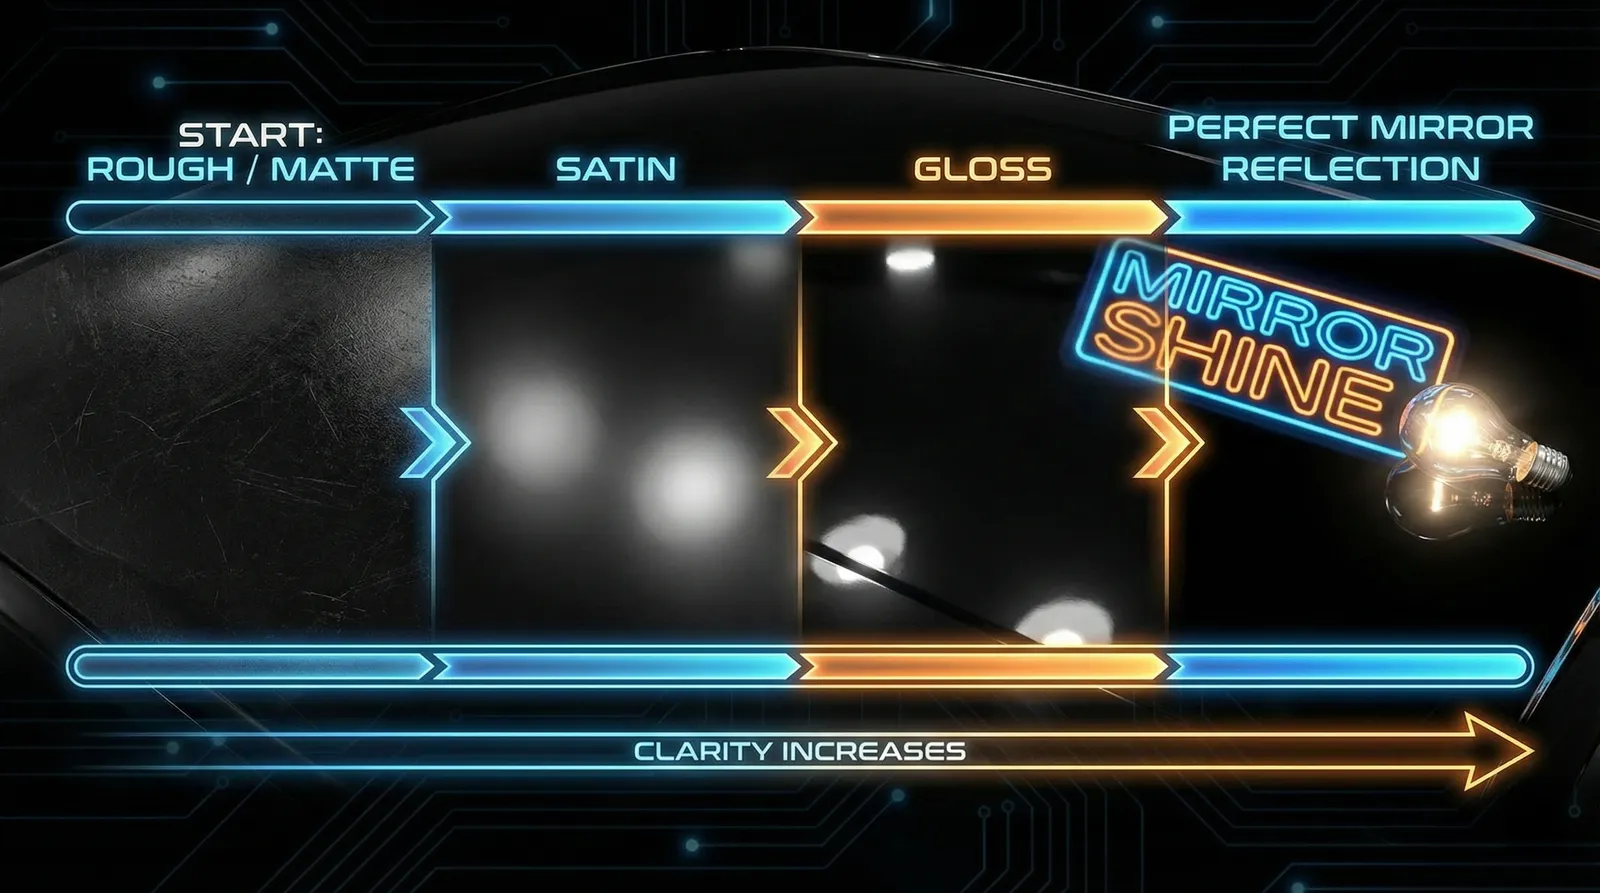
Achieving a "mirror" or "Ferrari" finish on a woodworking project is the hallmark of a master finisher. This level of brilliance is reached through a process called "Rubbing Out"—the deliberate abrading of a film finish to a state of microscopic levelness.
However, if you look at the user manual for your electric orbital sander, it likely carries a stern warning: "Dry Use Only."
As a Senior Master Finisher and Tool Safety Consultant, let me give you some "Real Talk": you can safely use an orbital sander for wet applications, but only if you follow a rigorous safety and technical protocol. Ignoring these steps doesn't just risk a ruined finish; it risks dielectric breakdown and severe electrical shock.
1. The Safety Matrix & Risk Analysis
Before you touch a power switch, you must understand the "Safety Matrix" of your equipment. Standard electric sanders are typically rated under the Ingress Protection (IP) system:
- IP20: This means the tool is protected against solid objects larger than 12.5mm (like a finger), but has zero protection against liquids.
- IPX0: Most standard sanders carry this rating, signifying no protection against water ingress whatsoever.
Tool Type Analysis
-
Pneumatic (Air-Powered): The gold standard for safety. Because there is no electricity at the tool, the risk of shock is eliminated. These units use internal exhaust caps and filtration plates to regulate air pressure and maintain a consistent 10,000 RPM.
Consultant's Note: To prevent substrate ingress (drawing dust back into the motor when the lever is released), never remove the exhaust cap. Maintenance is mandatory: direct 2 to 3 drops of specialized air tool oil (like SurfPrep SPT) into the air inlet at the end of every shift.

- Cordless: Safer for the user as there is no direct path to a wall outlet, but moisture entering a brushless motor can cause internal shorting and void warranties.
- Corded Electric: The highest risk. OSHA warns that shock hazards develop instantly if the tool is immersed, if the power cord is defective, or if a liquid "slurry" bridges the internal insulation of the motor housing.
⚠️ The GFCI Mandate
A Ground Fault Circuit Interrupter (GFCI/GFI) is a non-negotiable requirement. A GFCI monitors current flow and will cut power in milliseconds if it detects a ground fault—such as water creating a conductive path from the motor to your hand.
The Rule: If your shop outlet isn't protected, use a portable GFCI cord set. It is the only thing standing between a minor tool failure and a lethal accident.
In this rare stress test of a brushless electric sander designed for wet conditions, notice the emphasis on the sealed housing. Watch the hands-on demonstration of using an electric tool safely with water.
2. The Gear Trinity (Interface Pads & Modern Abrasives)
You cannot wet sand with standard hardware. To prevent "burn-through" (sanding completely through the finish) and "pigtails" (spiral scratches), you must use the following:
The Interface Pad
A soft foam interface pad is mandatory. It acts as a shock absorber for the machine's vibrations and allows the abrasive disc to conform to the curves and subtle undulations of the wood. Without it, the rigid backing pad will concentrate pressure on high spots, leading to immediate finish failure.
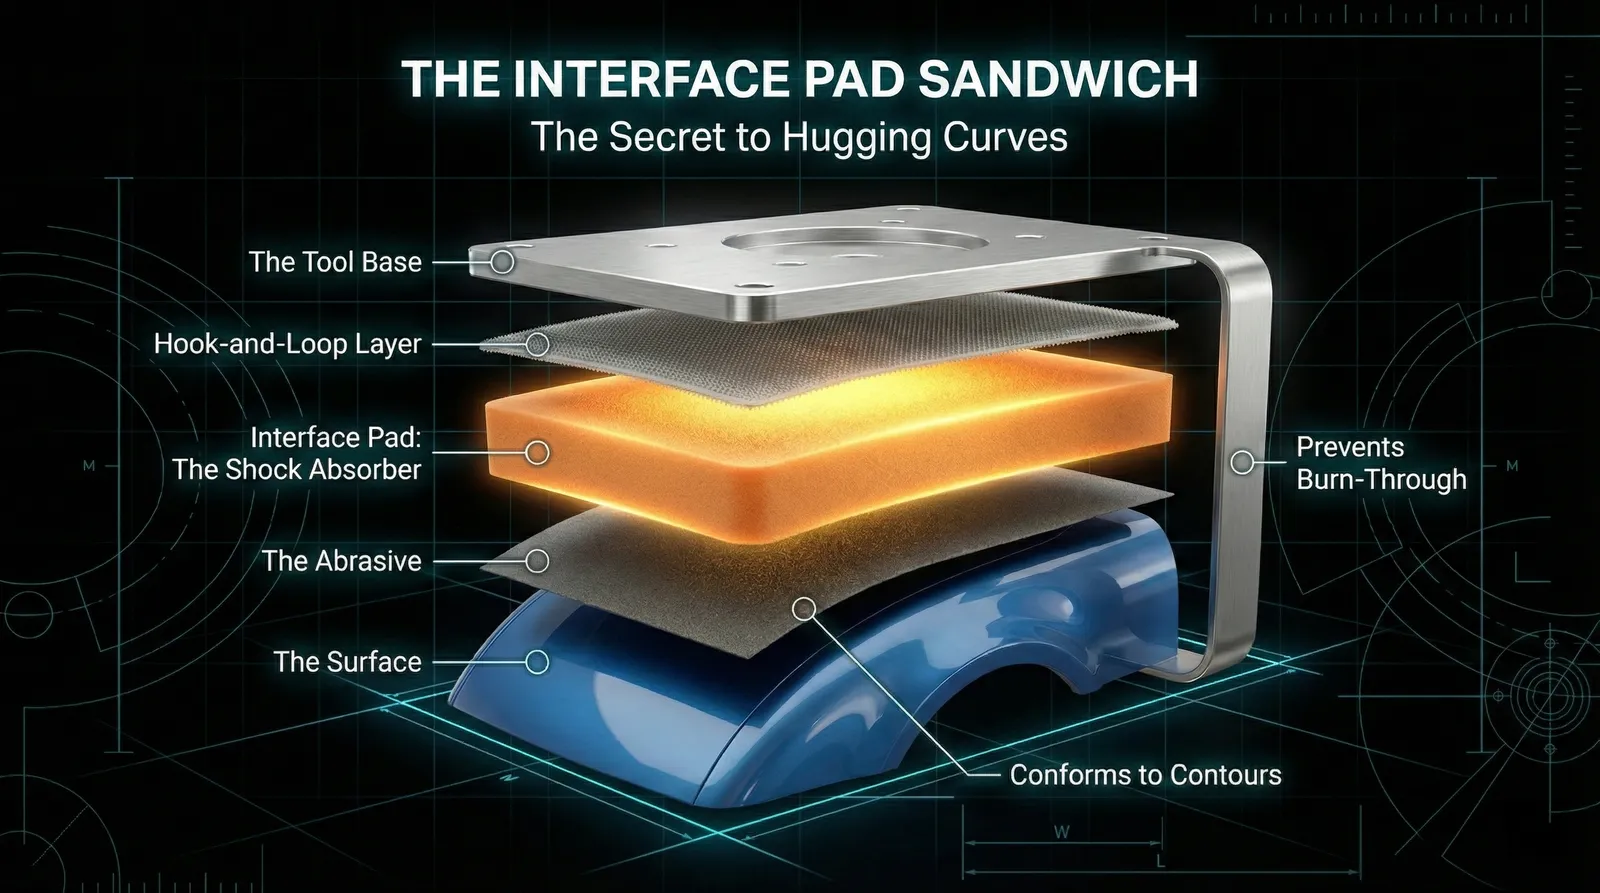
Detailing expert Mike Phillips shows exactly why the foam backing and interface pad combination is critical. Watch as he breaks down the "sandwich" layer system required to prevent pigtails: Backing Plate -> Interface Pad -> Abrasive Disc.
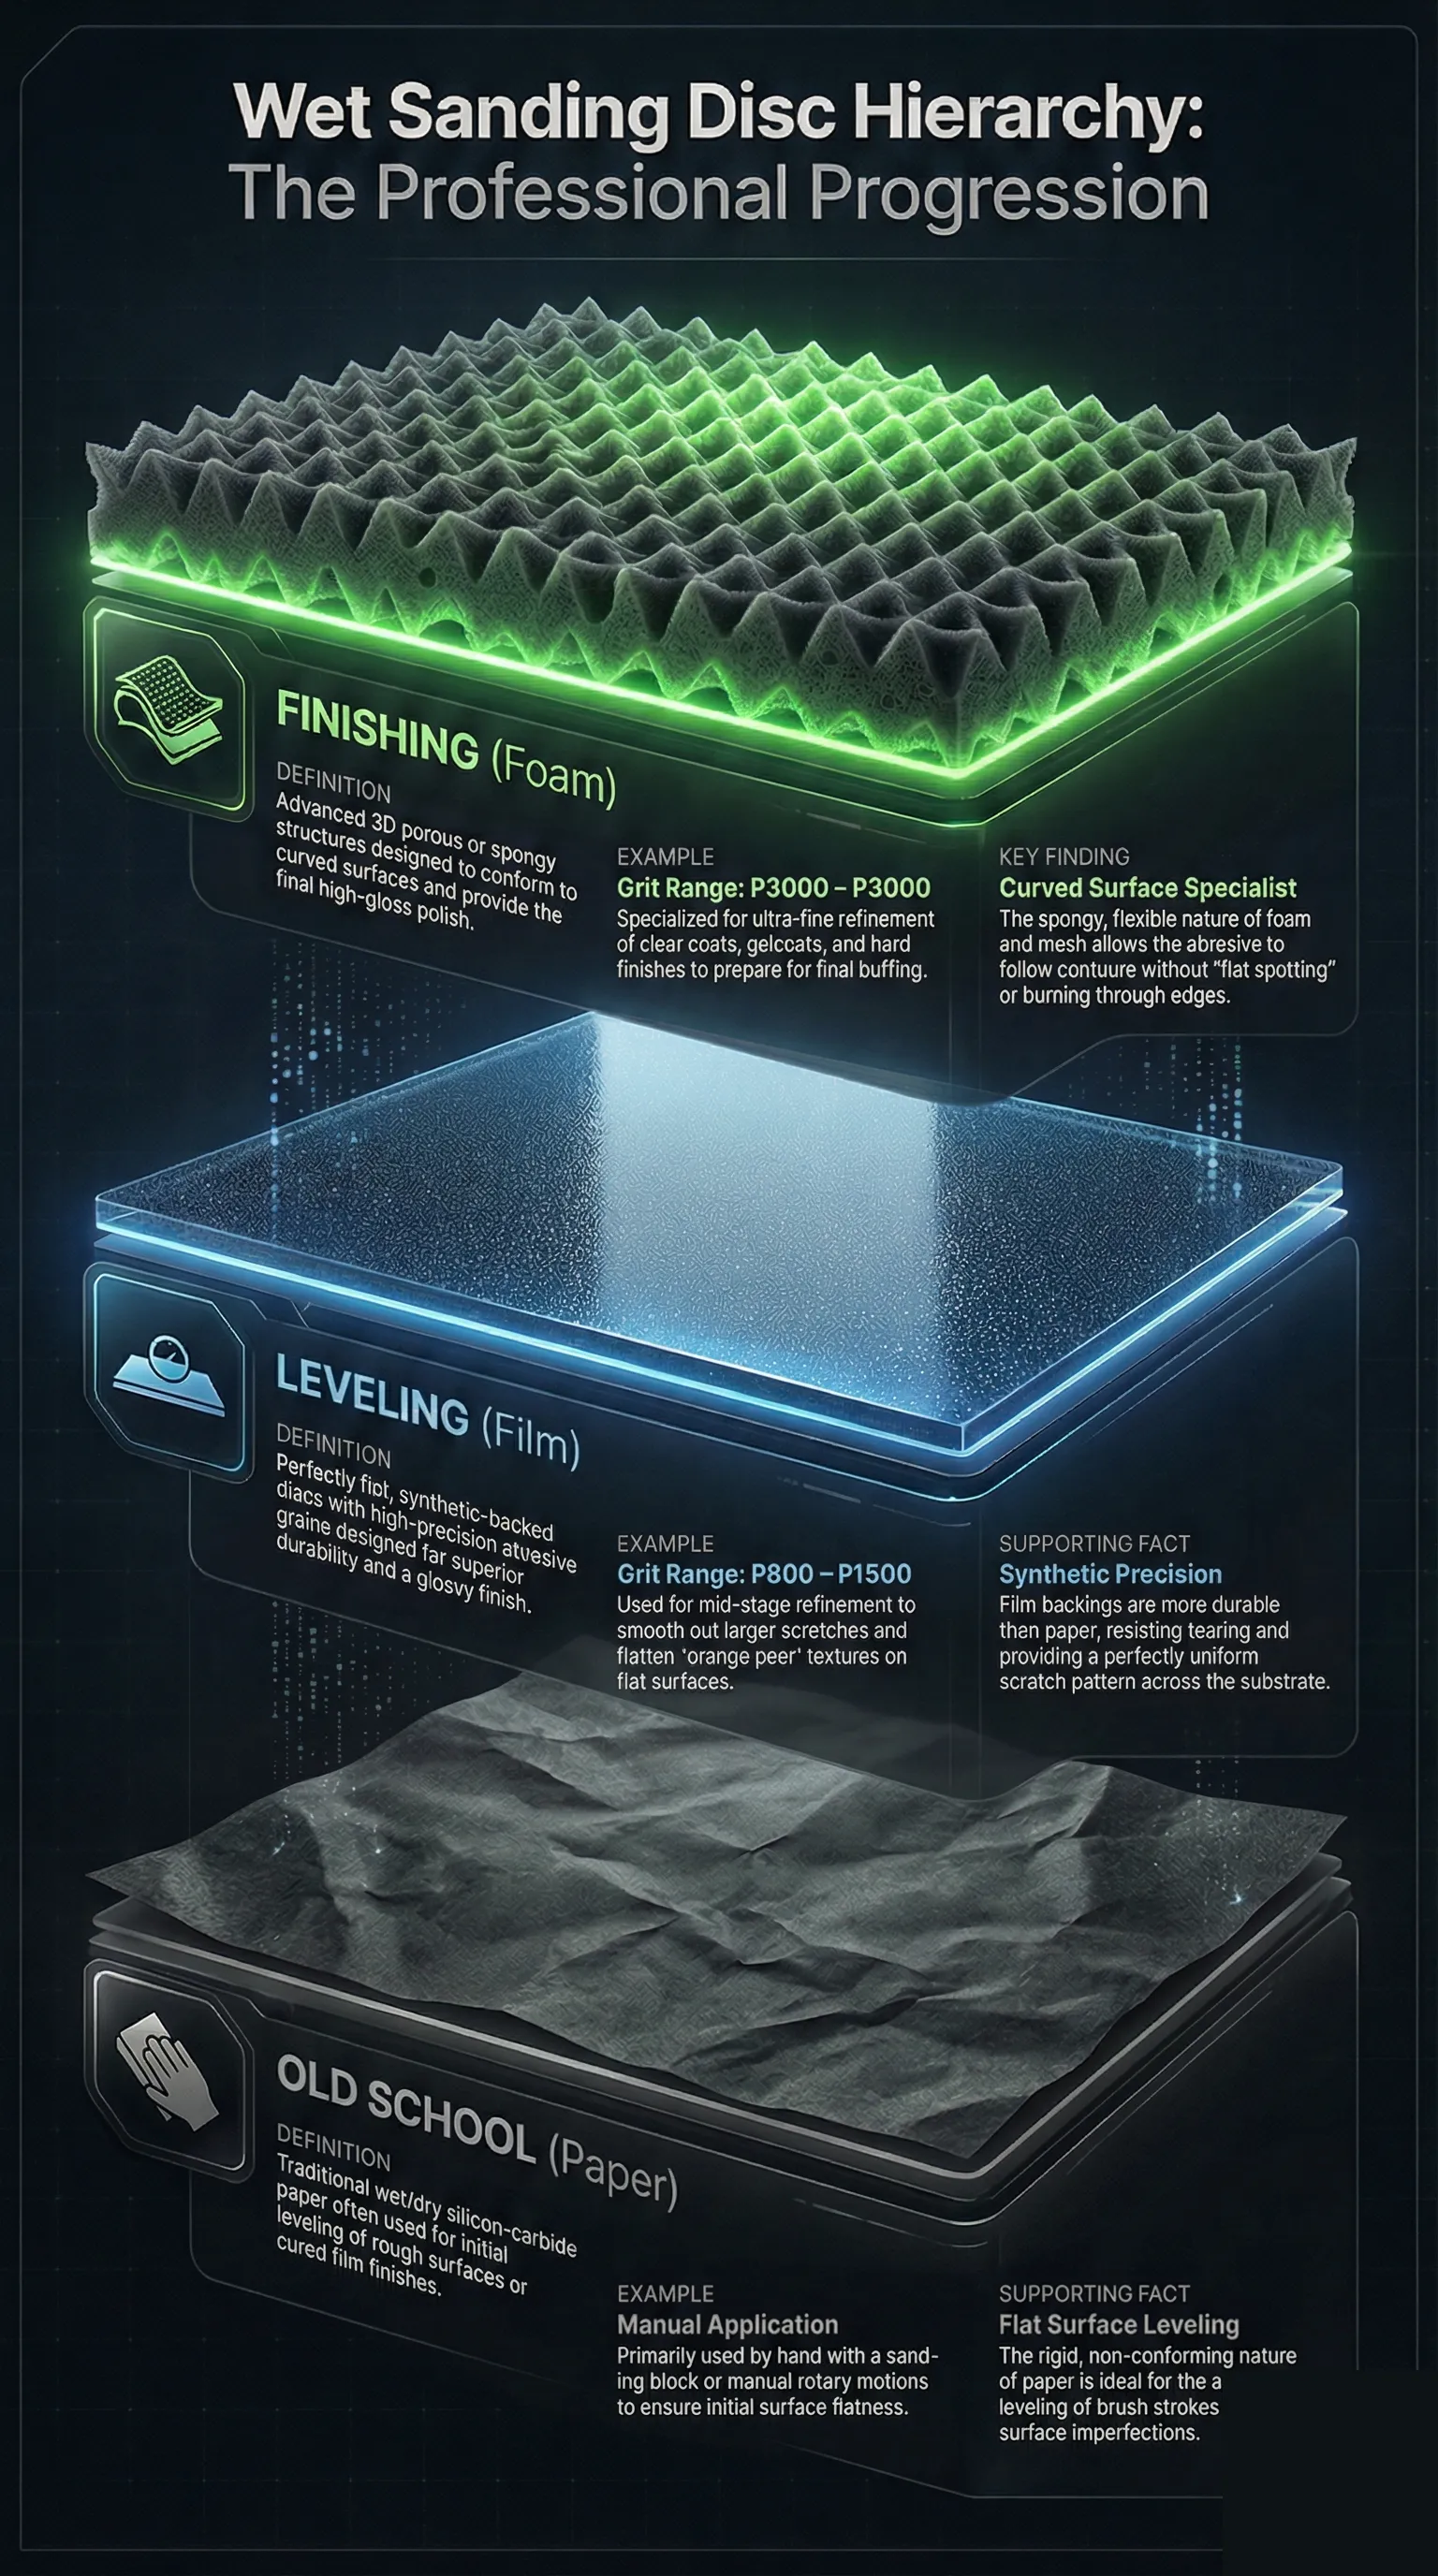
Modern Abrasives
Traditional paper-backed sandpaper is useless here; it swells, tears, and clogs. You must use Foam or Film-Backed discs, such as Mirka Abralon, 3M Trizact, or Festool Platin. These are designed for "wet/dry" use, allowing the water-slurry to flow through the material, which keeps the surface cool and prevents loading (the abrasive getting gummed up).
The Water Source & Physics of Soap
Skip the hose. Use a simple spray bottle with water and one drop of dish soap. The soap is critical: it acts as a surfactant to break surface tension, allowing the water to better lubricate the abrasive and carry away the sanded slurry.
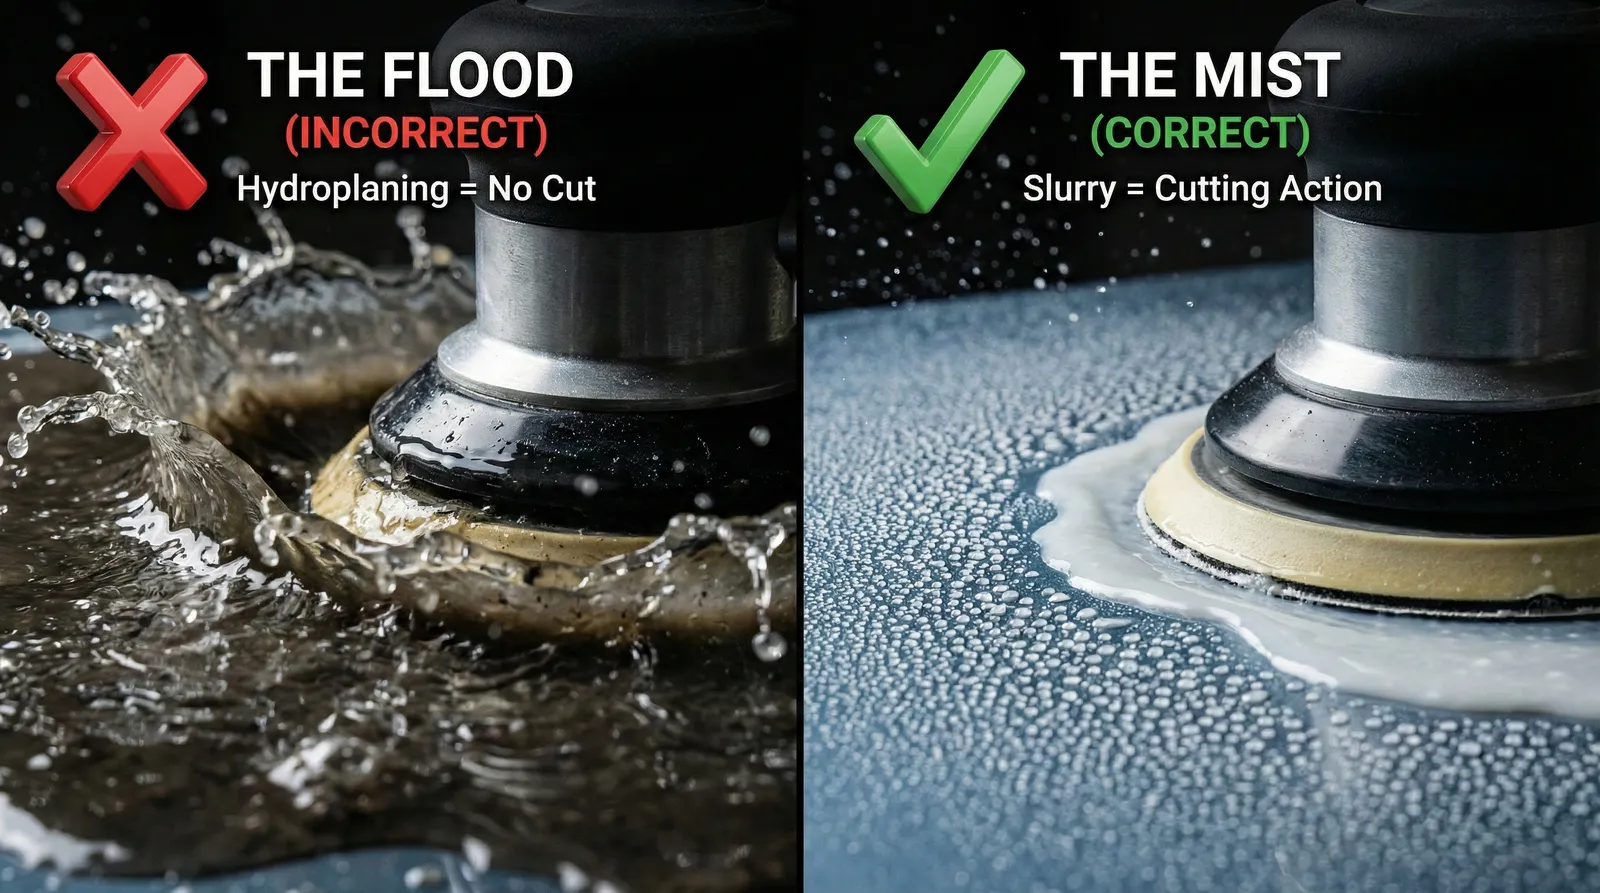
3. The Technique: Hydroplaning & The "Two-Mist Rule"
The physics of wet sanding is a balancing act. If the surface is too dry, the abrasive creates heat and burns the finish. If it is too wet, you experience hydroplaning, where the disc "floats" on a layer of water and fails to cut.
- The "Two-Mist Rule": Apply one spritz to the pad and one spritz to the workpiece. You are looking for a thin, milky "slurry," not a river.
- Pressure: ZERO. Use only the weight of the machine. Pressing down increases heat and the risk of the slurry being flung into the motor vents.
- Speed: Set your sander to Low (Setting 1 or 2, approx. 1500–2000 RPM). High speeds create a centrifugal "rain" that forces water into the tool's internal components.
Observe the "Two-Mist Rule" in action here. Note the thin, milky consistency of the slurry—it is damp, not flooded. Listen for the explicit instruction to apply only two mists to prevent hydroplaning.
- The Squeegee Check: Stop every 60 seconds and wipe the surface dry. You are checking the scratch pattern. If you see "shiny spots" or "pits," you still have Orange Peel (low spots). You must sand until the surface is a uniform matte before moving to the next grit.
Norton's technical experts specify the exact RPM range to prevent overheating and splashing. Listen for the specific recommendation: "Medium pressure at 1500 to 2000 RPM".
4. The Roadmap & Grit Progression
You cannot rush brilliance. If the finish is not fully cured, it will "corn" (clump) and ruin the surface.
Critical Curing Guidelines
- Lacquer, Shellac, Water-Based: Wait 1 week.
- Oil-Based Varnish/Poly: Wait 2 weeks (3–4 weeks for high-build).
The Professional Grit Ladder
- Stage One (Leveling): Prerequisite. Sand by hand using 320-grit wet/dry paper on a block. This levels dust nibs. Power sanding an un-leveled surface is the #1 cause of burn-through.
- Stage Two (Smoothing): Switch to the orbital sander with an interface pad. Progress through 500, 1000, and 2000 grit discs.
- Stage Three (Polishing): Optional P3000 disc, followed by automotive-style compounds.
The Golden Rule: Never skip more than one grit. Skipping from 800 to 2000 will leave deep, invisible scratches that only appear after you apply final polish.
5. Troubleshooting & Final Checklist
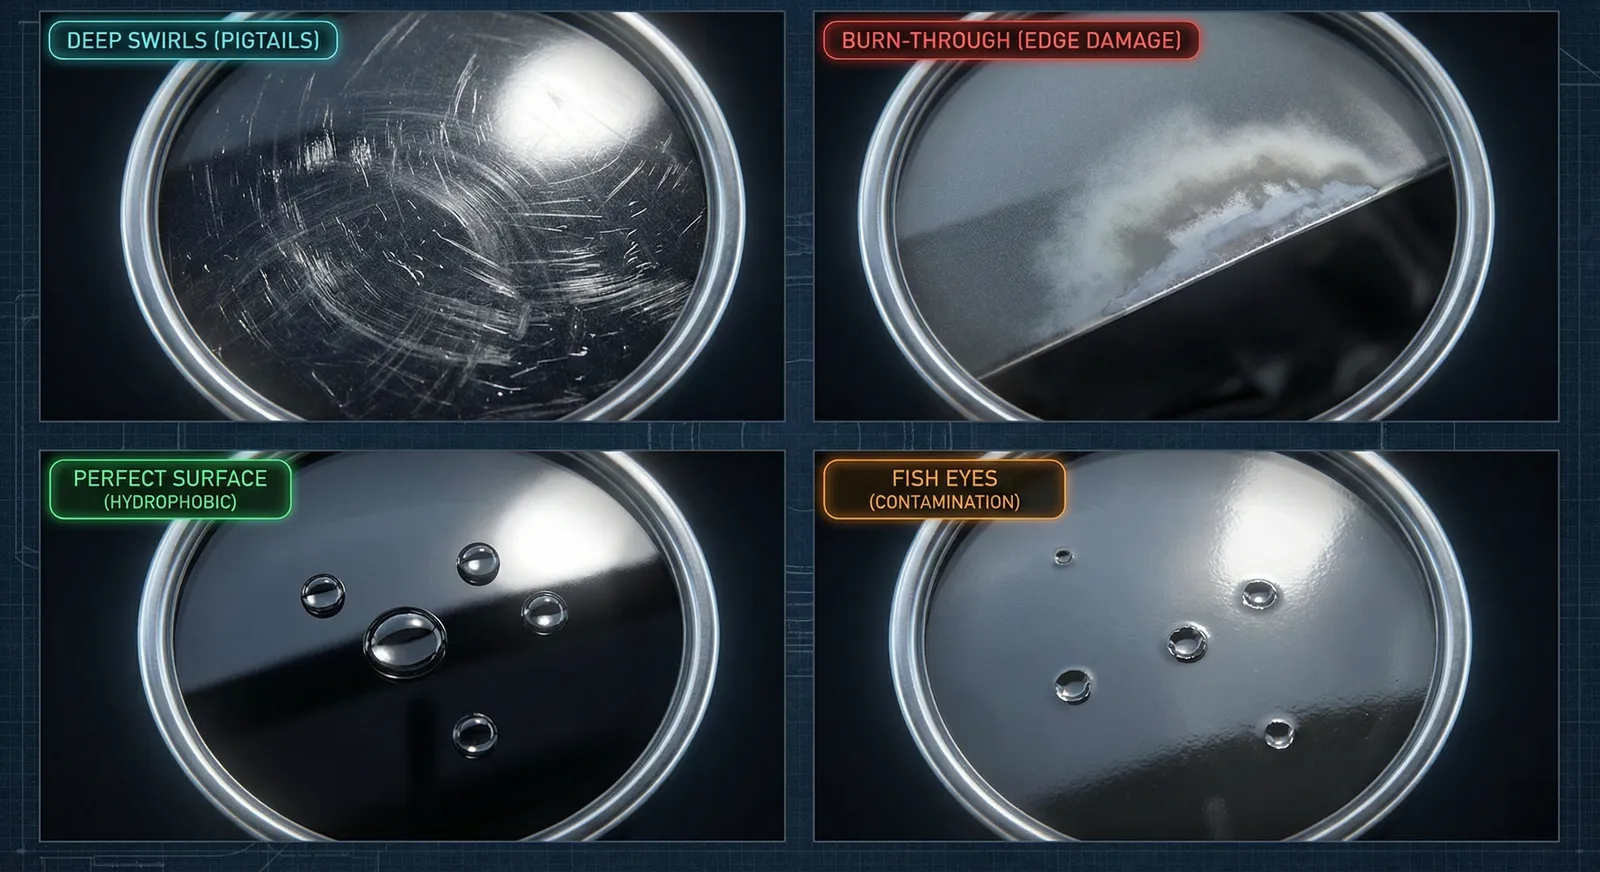
| Problem | Cause | Trade Solution |
|---|---|---|
| Pigtails / Swirls | Dirty pad or no interface pad | Use a clean foam interface pad; clean surface between grits. |
| Not Cutting | Hydroplaning or Glazing | Too much water or worn abrasive. Wipe dry and use "Two-Mist Rule." |
| Burn-through | High speed or un-leveled surface | Reduce speed; ensure Stage One hand-leveling was completed. |
| Finish Peeling | Improper Curing | Stop immediately. The finish is too soft; wait another week. |
The Final Safety Checklist
- ✅ GFCI: Is the tool plugged into a millisecond-trip protected circuit?
- ✅ Interface Pad: Is the foam "cushion" between the tool and the disc?
- ✅ Two-Mist Rule: Are you using a spray bottle rather than a stream?
- ✅ Low Speed: Is the dial set to the lowest effective setting (1-2)?
- ✅ Curing: Has the finish cured for the required 1–4 weeks?
Conclusion
Wet sanding with an orbital sander is the secret to a "glass-like" finish that separates amateur work from a "Ferrari-level" masterpiece. However, the result is entirely dependent on your discipline. By respecting the volatile combination of water and electricity and adhering to the leveling prerequisites, you can achieve a marble-smooth surface safely.
Discipline in the protocol ensures brilliance in the finish. Respect the tool, respect the cure, and the results will speak for themselves.

HYCHIKA BETTER TOOLS FOR BETTER LIFE
HYCHIKA Detail Sander, 14,000 OPM Compact Electric Sander Tool with 12 Pcs Sandpapers,Efficiency Dust Collection System,Suitable for Tight Spaces Sanding,Polishing,Removing Paint in Home Decoration

Makita
Makita BO5041K 5-Inch Random Orbit Sander Kit,Teal

DEWALT