When it comes to sanding any dry joint compound or drywall, the production of dust is inevitable. The most annoying thing is that because dust is so light, it will float around the room and land on every surface possible, often making this one of the most difficult aspects of carrying out general wall repair. However, do not fret! There are several great methods available that can massively reduce the amount of dust produced when sanding drywall. That being said, it is important to note that you might potentially need to throw down some money on additional tools in order to do so. Here are six ways to sand drywall without dust (or at the very least keeping it to a minimum!) Let’s get into it.
1) Suit Up
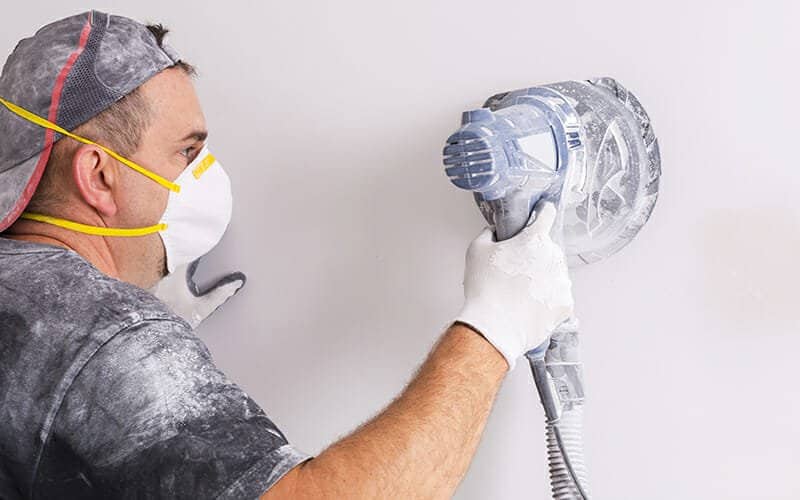
For many of us DIYers or handymen, this point might seem obvious, but for those that maybe have just gotten into DIY, wearing the appropriate gear is very important for sanding – or any kind of handiwork for that matter. Apart from the need to be safe, wearing protective clothing is also an important way to manage dust.

As you know, dust is very small and can quite easily get into your eyes or hair, which of course is not ideal. Therefore, it is advisable that you get your hands on a decent pair of safety goggles to keep the dust from getting into your eyes as well as a dust mask of some kind for further protection. Additionally, you might want to get a disposable hat to keep the dust out of your hair. Keeping it off your body is the first step you want to take in order to manage the potential spread of dust efficiently.
2) Using a Dustpan to Catch Excess Dust
One very simple, but effective, method to reduce the amount of dust spreading around the room to nearby surfaces is to use a dustpan. By placing it at an angle, just underneath the area that you’re sanding, a lot of the dust will be caught by the dustpan where it can then be thrown straight into the trash. Most people own a dustpan and brush, making this is an easy and free method you can use right away. To get the best results, use a rubber-edged dustpan as it hugs the wall a lot more closely and ensures that you catch the maximum amount of dust possible.
3) Use some Blue Painters Tape
Another great method to keep dust to a minimum is to use some blue painter’s tape. Simply tear a decent-sized piece off and stick it to the wall just underneath the area you’re sanding, ensuring that it is wide enough to catch any dust that falls down. Once you have finished sanding, gently remove the tape, carefully scrunch or fold it up and throw it away. This method is great, however, it is more suited to smaller sanding jobs. While blue painter’s tape isn’t something we all keep at home, you can source some quite cheaply at your local hardware store or online.
4) Use a Shop-vac or Vacuum
In a similar way to the previous methods listed above, positioning your shop-vac or vacuum underneath the area you are sanding is a thoroughly effective way to manage dust production. It not only catches the dust that falls down but the smaller bits of dust that might have floated into the air will be sucked up as well. If you don’t have a shop-vac you could use your ordinary vacuum one-off but keep in mind that as it is not an industrial vacuum, you bear the risk of damaging it. To stay on the safer side, it would be advisable to purchase an industrial vacuum or shop-vac. While this setup is sufficient for most jobs around the house, if you’re installing new drywall on high walls, on ceilings, or maybe are carrying out extensive plaster repair, it would be better to opt for a light pole-like attachment. This will make the whole process a whole lot easier, allowing you to reach those more difficult areas without wearing your arms out.
5) Use a Drywall Hand Sander Kit
Lastly, and probably the most convenient option, is to use a dust-free drywall hand sander kit. Most that are available on the market quite easily attach to most mainstream brands of shop-vacuums. If you aren’t familiar with this, a hand sander kit is simply a pipe or attachment that connects directly to your shop-vac, with a drywall screen attached at the end. Drywall hand sander kit attachments are great because the moment you start sanding, any dust produced is immediately sucked up by the shop-vac – easily making this the most effective method to sand drywall without dust. For best results, when you are sanding drywall using a Drywall Hand Sander shop-vac attachment, it is important that you are not going too fast otherwise less dust will be caught. Go slowly enough to let the shop-vac do its job. While this method is certainly convenient, sanding might take you a short while longer than usual, but this is a small price to pay if it means post-cleanup is massively reduced.
6) Upgrade your Shop-vac
If you already happen to have a drywall sander kit and a shop-vac, you are off to a good start. However, if your shop-vac is old and worn out it will only hinder instead of help, and therefore, it might be time for an upgrade. Ultimately if you’ve had your shop-vac for a while and it isn’t as powerful as it once was, it will only cause you a further headache. There are many options out there that are halfway decent and it will get the job done – without causing you to break the bank. If you do not plan to regularly need to sand, and then your older shop-vac might be able to do the trick.
7) Use an orbital sander that comes with a dust collection unit built-in
Some orbital sanders come with a built-in dust collection unit. A good example of this is the Dewalt DWE6421K sander kit. This power sander comes with a detachable dust collection unit that will collect the majority of dust as it comes off the surface. Once the unit is full, you can detach, empty, and then continue sanding. Whilst this type of device will not collect all of the dust, it will significantly reduce the amount of dust that escapes into the air whilst you are sanding the drywall.
Final Words
And there you have it. Six great ways to help keep the production of dust at bay and make sanding a lot less tedious than it needs to be. When it comes to managing the spread of dust it goes without saying that you should place down plastic sheeting and secure it with masking tape to catch all the dust that happens to fall through the net. Once you have finished sanding, let the dust fully settle for a while before gently folding the plastic sheeting up and disposing of it. Happy sanding!

PORTER-CABLE
PORTER-CABLE 20V MAX* Random Orbital Sander, Cordless, 5-Inch, Tool Only (PCCW205B)

HYCHIKA BETTER TOOLS FOR BETTER LIFE
HYCHIKA Detail Sander, 14,000 OPM Compact Electric Sander Tool with 12 Pcs Sandpapers,Efficiency Dust Collection System,Suitable for Tight Spaces Sanding,Polishing,Removing Paint in Home Decoration

Makita