Orbital sanders are an extremely diverse power tool. They can take the heavy work out of many DIY projects. But in order to get the most use out of them, it is important that you learn how to use an orbital sander. That knowledge will help you to select the right type of sander as well as the correct accessories for each particular project that you undertake. In turn, this will allow you to gain the maximum benefit from your orbit sander.
What is an Orbital Sander?
An orbital sander is a type of power sander that has been designed specifically to avoid making marks, scratches, or abrasions on the surface or material being sanded. The name is given to the power sander because of the orbital shape of the discs. Orbital sanders come in many different styles and they also use different power sources including battery, direct current (mains powered), and air-powered variants. They all have one thing in common though and that is the specific way in which the sanding disc rotates. The disc always rotates in an orbital motion spinning on a ball-bearing. The disc rotates on its axis and also “jitters” side to side, creating an elliptical, and random, motion. More about this later.
A Brief History of the Orbital Sander
Orbit sanders may seem like a relatively new addition to the power tools aisle in your local hardware store but in fact, they are the grandfather of all sanders. Their history relates back to when the first electrical drills were introduced and the orbital sander was simply an attachment that fitted into the drill and had a sanding pad on its end. This pad would then be rotated by the drill and would form a crude orbital sander. At the time this type of sander was considered very hard to use because the powerful drill rotating the sander in a regular and circular motion made it very hard to control. It also meant that circular marks and gauges were very common.
Today this concept has been adapted into what we know as the random orbital sander. the big difference with today’s sanders is the way that the disks rotate – as the name suggests the rotation is random thanks to not only the rotating disk but also an oscillating motion that comes from the sanding unit. The two oscillating motions combine to make a random movement. And it is this random movement that helps to avoid gouges and circular markings on the surface being sanded.
In addition to this, many orbit sanders also have vibration reduction features that help to make the sander easy to control, light and this allows the user to have more control over the sanders movement and allows for a very fine finish to be achieved.
How Does an Orbital Sander Work?
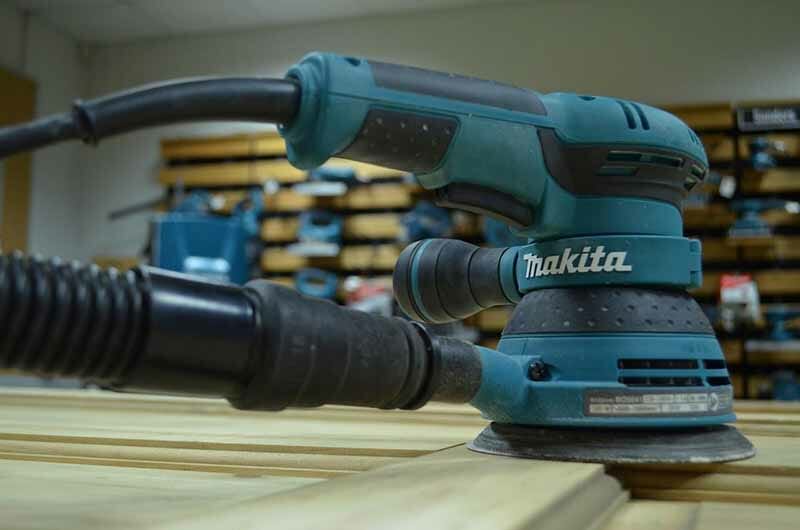
Orbital sanders are relatively simple tools. The main components are a small motor (Typically powered by electricity) connected to a ball-bearing system. This system is in turn connected to a rotating pad. Many of today’s sanders have a hook and loop system whereby a sanding disk can be easily attached to the pad. The key part that makes an orbital sander so good at the job it does, is the way in which the sanding pad rotates on the ball-bearing. This is where the “random” nature of this tool comes in handy. The pad will turn in an elliptical and random manner to avoid sanding the same area twice. Effectively it moves around the surface randomly to ensure that it never spends more than a brief moment sanding any particular part of the surface.
This prevents sharp abrasions or grooves from being cut into the surface on which you are using the sander and it is why the tool is so often used for sanding uneven surfaces.
How to Use an Orbital Sander

Preparation
As always, preparation is key. Before you start work make sure that you are fully prepared, being well prepared makes you more comfortable when sanding and avoids you from getting stressed out, which can result in the job being rushed. Before you actually learn how to use an orbital sander, prepare the following equipment before you start work –
- Eye protection
- Dust mask
- Gloves
- Make sure any delicate areas are covered
- make sure you have the right sanding disks for the job – Sandpaper is described with a numbering system that runs typically from 60 to 240. The coarse end of that scale is 60.
5 Tips for Achieving a Perfect Finish with your Orbital Sander
Secure the Sanding Disk or Pad
Most orbital sanders today use the hook and loop system, this makes securing the sanding pad very easy but even so you should ensure that the pad is firmly secured to the device. It is important not to over-use sanding disks because when the hoops on the back of the pad become clogged up with debris and dust the grip becomes less effective and this can result in uneven sanding.
Use Ventilation
Ventilation and dust extraction are very important when using your orbital sander. Not only does it make for a safer working environment but debris and dust can also have a negative effect on the surface being sanded. The best orbital sanders tend to come with dust collector fittings that will aid in the removal of dust as you are sanding. This helps to keep the surface that you are sanding clear from debris and makes it more likely that you will get a clean finish, it also makes it easy to see the progress of your work.
Keep the Sander Moving
Once you start sanding, keep the orbital sander moving constantly – although most orbital sanders have their own random action, if you keep the unit moving as well it will provide an even smoother finish to the area that you are sanding. In fact, this is possibly one of the most important points to understand, when learning how to use an orbital sander. Without taking heed of this advice you are likely to cause harsh abrasions in the material that you are sanding. This can make the job of creating a smoother surface even harder than it was to begin with. So understanding the need to keep the sander moving is crucial.
Maintain a Constant Level of Pressure
In order to get the best results from sanding you should maintain a constant level of pressure to the surface you are sanding. If you press too hard the orbital sander slows down and can become less effective. If you press too hard it is likely that you will not be able to maintain that pressure and this can result in an uneven surface area. So keep a light but firm pressure on the sander at all times.
When you start sanding, make sure that you let the sander spin up before touching down on the surface. Unless you have a random orbit sander with automatic speed control.
Equally, when you finish sanding make sure you let the sander spin down fully before you remove it from the surface – and crucially before you stop moving the sander.
Keep the Sander Level
Although you can use an edge of the sanding pad it is preferable to keep the full pad area on the surface as you sand – this ensures a smooth sanding action and it also allows the power of the sander to be equally distributed over the entire sanding pad.
When to use an Orbital Sander
As we have already outlined, an orbital sander can make many sanding projects much easier. The fact that you are using a power tool generally means that a lot of the effort and “grunt work” is being taken care of for you, making the job far less strenuous. However, there are some situations where you might not want to use an orbital sander. In fact, sometimes it could be detrimental.
Orbital sanders are generally good to use when you are undertaking large sanding projects – this could be in the form of a large area that needs sanding down or an item that requires intensive sanding to strip down a think surface, or one with multiple abrasions. With these types of projects, as long as you find the best orbital sander for the job, you will save lots of time and effort, and furthermore, you will likely end up with a far superior finish than you could achieve by hand.
In other projects, perhaps ones where you are only sanding a small area, it might be better to use a manual sanding method such as a sanding block and sandpaper. First of all, if you are sanding a very small area then it may actually be more effort getting the orbital sander set up and then clearing up all of the mess afterward. Also, if you are sanding a small area then the orbital sander may not be able to get into the small corners of the sanding area. These are all cases where it would make more sense, and in fact would be easier, to sand the surface by hand.
As such, it is important that you think carefully about when to use an orbital sander, and when to use a manual sanding method. That being said, there are many projects that will benefit from the involvement of an orbital power sander, some of which we are going to outline below, so that you understand not only when to use an orbital sander but also what type of sander to use.
How to Sand a Wall
Sanding drywall with an orbital sander is a very common task. There are a few points that you should take note of though, before undertaking such a project. First of all assess the wall that you are going to sand, depending on its condition, level of smoothness, and surface type you should be able to pick appropriate sandpaper.
Remove as much lose material as possible from the wall before sanding. For example, if the wall has had wallpaper on it, remove as much of this as possible first. Sanding a wall that still has loose material attached to it will result in the sander becoming clogged up and this will make the job much harder.
When using a random orbital sander on a wall, make sure you keep the full surface of the orbital sander in contact with the wall at all times. Whilst you are sanding, move the sander in a circular motion and never allow the sander to remain in a fixed position whilst it is spinning.
Do not be tempted to push too hard on the sander – orbital sanders actually work best when they make only light contact with the surface being sanded and the weight of the orbital sander itself provides adequate pressure to the surface being sanded.
Let the rotating disk do the work – some sanders spin at speeds up to 12,000 rpm – which means the sanding disk is spinning around 12,000 times per minute. Adding pressure to this will normally result in the sanding disk slowing down and this makes it far less effective.
Be patient – if it looks like the sanding isn’t going well, it’s easy to think you need to apply more pressure, but don’t. instead, be patient and let the sander do its job slowly and efficiently.
Don’t use the same pad for too long a period – if the pad feels smooth then you should change it for a new one – once debris and dust get ingrained in the sanding pad it will become less effective.
How to Sand Plaster
Plaster is considered a relatively lightweight material when it comes to sanding. For this reason, you should be very careful when sanding plaster. It is very easy to create imperfections and gauge marks on plastered surfaces if you sand the area with too much pressure or an uneven surface. We often get asked how to sand plaster walls, so hopefully, these tips will help you to get the perfect finish on your next plaster wall sanding project.
For this reason, you should select finer sandpaper for sanding plaster – if the surface is relatively smooth, to begin with then you can use a medium sanding disk (120-150 grit).
If the plaster wall has visible imperfections or gauges then you can use a more coarse sanding disk (80-100 grit).
When sanding plaster it is even more important to let the orbital sander use its own weight and not to put any additional pressure down on the sander. Also, you should keep the sander moving at all times, using a circular motion as you sand the plaster wall.
Implementing these techniques, as well as moving the tool very slowly and evenly and when sanding plaster walls, will help to avoid gauges and uneven areas on the plaster wall.
As the surface of the wall becomes smooth you can gradually reduce the coarseness of the sanding disks by changing to higher and higher grit ratings – remember the higher the rating, the lighter the sandpaper, and the smoother the finish that will result.
How to use an orbital sander to Sand Hardwood Floors
If your floor is made from solid hardwood then you can safely sand it using an orbital sander. If your floor is made from engineered hardwoods then it may not be safe to do so because the wood may become visibly damaged when you sand it – because it consists of several wood layers. If you’re not sure if your hardwood floor needs refinishing, put a few drops of water on it. If the water beads or soaks in slowly over a few minutes, you probably just need a good cleaning and polishing. However, if the water soaks in immediately, it’s time for a refinish.
If your floor is damaged, water-stained, or has wax over the finish, you’ll need to sand to bare wood.
When sanding a hardwood floor you should sand in several stages, each time using progressively lighter sanding disks. First of all, use a coarse sanding disk (30-40 grit), then a medium 50-60 grit, and finally a fine 80-100 grit or higher.
Doing this in stages helps to provide the finest possible finish to your hardwood floor whilst also ensuring that you will remove all imperfections from the surface.
It is also very important when sanding wood that you sandpaper with the grain – instead of sanding in circular motions like you would on a plaster wall, sand in forwarding motions following the grain of the wood. This helps to avoid scratching the wood surface with the sanding disk.

Milwaukee
Milwaukee Electric Tools 2648-20 M18 Random Orbit Sander

LDHTHOPI
LDHTHOPI Buffer Polisher, 1600W 7 Inch/6 Inch Rotary Buffer Polisher Waxer, 7 Variable Speed 1000-3500 RPM, Detachable Handle for Car, Boat Sanding, Polishing, Waxing

DEWALT